Using NileDesk
This section covers the core features you’ll use in your day-to-day work: managing processes, tasks, and documents in NileDesk. It’s designed for team members who interact with solutions built on the platform. By understanding these areas, you can complete work efficiently, collaborate with your colleagues, and keep track of progress.
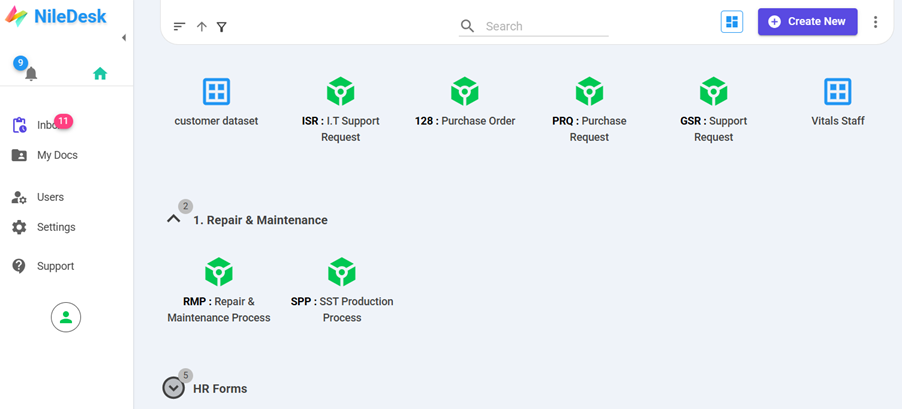
Home
The Home page is the first screen you see after logging in. Think of it as your command center — from here you can quickly access all the processes, boards, datasets, and forms you’re authorized to use.
- Start new documents in processes you have access to — begin workflows without delays.
- Open boards to track tasks visually and see where things are moving or stuck.
- Browse datasets and forms for structured records, ensuring data stays consistent and up-to-date.
- Access pinned or frequently used templates for faster navigation.
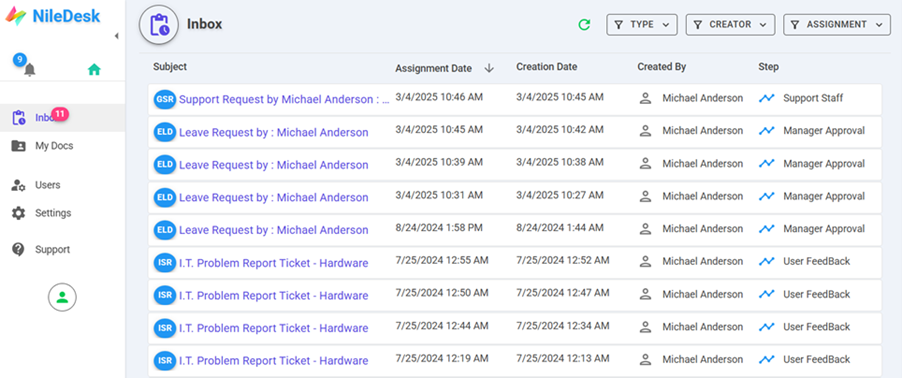
Inbox
The Inbox is your personal task list. It shows all documents and assignments currently waiting for your action, so you never lose track of what needs attention.
- Open a task, complete required fields, and then submit, forward, or finish it depending on your role.
- Use filters to focus on tasks by priority, due date, or workflow stage.
- Pin important items or create Custom Views for quick access to recurring work.
- Keep an eye on overdue or flagged tasks to avoid delays in approvals or processes.
Tip: Inbox only shows items that need your action. Once you forward or complete a task, it disappears from your list automatically.
My Docs
The My Docs section is your personal workspace. It lists all documents you’ve created or participated in across any process, so you can always revisit your work and track its progress.
- Use search or filters to quickly find a specific document.
- Check document status and history to see where it stands and what’s already been done.
- Follow up on pending approvals, requests, or tasks you initiated.
- View details such as assigned users, submission timestamps, and linked datasets for complete context.

Start Working with Processes, Boards, Datasets, and Forms
Once you’re familiar with Home, it’s time to start working. Every icon on your Home page represents a process, board, dataset, or form you have access to. Simply click an icon to open its workspace.
Processes & Boards
When you open a process or board, you’ll see its Workspace with a list of all items (documents or tasks) that belong to it. From here, you can:
- Click on any item's Subject link to open and work on it.
- Click on any item's Timeline icon to view this item/document's timeline.
- Access overviews, reports, charts, PDFs, and DataTags for insights into the process.
-
Create a new item in two ways:
- Quick way from Home: hover over the process/board icon, click the … (options) menu, and select Add Item. A form opens — fill it, submit it, and the item starts executing immediately.
- Inside the workspace: use the Add Item button at the top to create a new entry in that process or board.
Datasets
Datasets work like a spreadsheet for storing structured data. When you open a dataset, you’ll see a cell-based matrix where you can:
- Add new rows by pressing the + button.
- Edit any existing cell directly, just like Excel.
- Select a row by clicking its row number, then use the Delete option to remove it.
Data Forms
Data Forms display records in a structured table, but unlike datasets, they cannot be edited directly in the grid. Instead:
- Click on a row to open its form and make updates.
- Press the + button to add a new record via the form interface.
Tip: Use Home for quick actions, but head into the workspace if you need full context, reports, or advanced options for your process, board, dataset, or form.
NileDesk Administration
If your role involves managing your NileDesk account, the following sections will help you:
- Settings: Configure the core account-level settings for your NileDesk account, such as Organization Name, Time Zone, Logo, Work Calendar, Global Notification preferences, and NileDesk License information.
- User Management: Manage your team members’ accounts. Here you can create, delete, activate, or deactivate user accounts, and centrally authorize them to access templates. In addition, this section allows you to manage user groups and configure user delegations.
Note: Templates can also be shared individually via the Share option in Home for each icon.
Contact NileDesk Support
NileDesk provides in-app options to contact the support team. If you have any questions or queries regarding the application, you can reach out directly from within the app. The Support option is available only to the user designated as the main contact in the license settings.
To contact NileDesk within the app, navigate to the Support page.
If you have any previous active or closed conversations, you can view them on this page. To start a new conversation, click on the Start New Conversation button at the top right.
Enter your conversation subject, select the conversation type, and write your message. After clicking Send, a new conversation will be created, and a member of the NileDesk team will respond. You can then continue the conversation with them directly in Support Chat.
If you are not the designated support contact, please reach out to your assigned user within your organization so they can relay your issues to NileDesk.
User Profile Icon
In NileDesk HelpDesk, the User Profile Icon is available on the sidebar in larger screens and on the top right corner in mobile view for all users.
This icon provides quick access to options related to individual users, including:
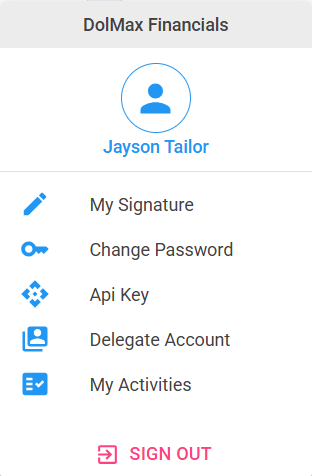
My Signature
Users can set their default signature for NileDesk, making it easier to sign documents without recreating the signature each time.
- Upload a signature picture
- Draw using mouse (desktop) or finger (mobile)
Change Password
Users can update their account password for security.
API Key
For Zapier integrations or direct API access, users can generate their personal API key here.
Delegate Account
This option allows a user to delegate their account to another user, especially useful during absence or holidays. All processes and documents assigned to the original user will be redirected to the delegated user for the set period.
My Activities
Provides a history of the user’s actions on different documents, including submissions, processing, returns, and cancellations.
Sign Out
Allows the user to securely sign out of NileDesk.
Forgot Password ?: Users can reset their password by providing their email and organization id at login screen by clicking Forgot Password ? link.