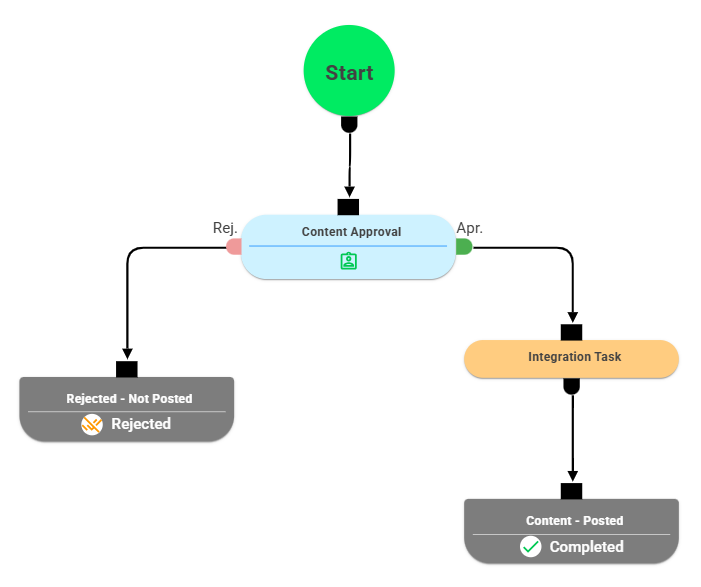
Integration Task
The Integration Task in NileDesk allows your workflows to seamlessly connect with external applications. Whether you use popular apps, Zapier’s massive app ecosystem, or your own custom APIs, Integration Tasks make cross-platform automation simple and efficient.
Types of Integrations
- Native Integrations – Connect directly with supported apps like Slack, Jira, or WhatsApp.
- Zapier Integration – Access thousands of applications through Zapier’s automation platform.
- Custom API Integrations – Define and execute your own HTTP API requests for maximum flexibility.
Adding an Integration Task to a Workflow
- Add an Integration Task – Insert an Integration Task into your workflow just like any other step.
- Open Task Configuration by selecting the task and clicking on its settings icon.
- Select Integration Type – From the dropdown, choose:
- Native Integration App
- Custom API
- Zapier
- Configure the Integration – Fill in app-specific or API-specific details depending on the integration type.
Native Integrations (Slack, Jira, WhatsApp)
Native integrations let you connect directly with supported apps:
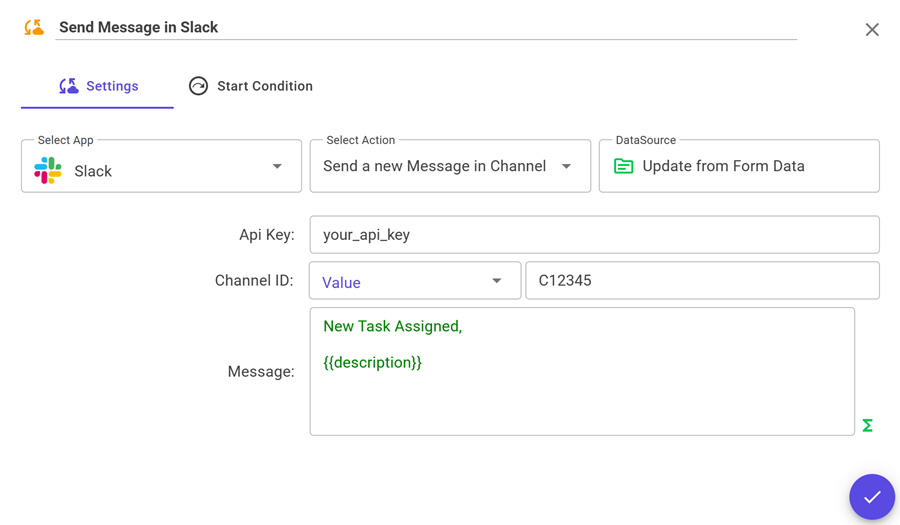
- In the Integration Task, select your target application (e.g., Slack, Jira, WhatsApp).
-
Choose a relevant action such as:
- Slack: Send Message
- Jira: Create Issue
- WhatsApp: Send Notification
-
Select the Data Source:
- Form Data – Sends data directly from workflow forms.
- Table Data – Sends row data from form tables (optionally filtered). Each row of the table is sent as a separate API call.
- Provide required details such as API Key, Channel ID, Project Key, or Message Text.
- Save and test the integration.
Example: A Slack notification can be triggered whenever a customer ticket is escalated.
Message text may include dynamic fields such as:
"High Priority Ticket from {{customer_name}}: {{issue_summary}}".
Note: Certain Native Integrations require API keys or registration with the app provider. For example, WhatsApp requires an API key from Meta, which the user must obtain and enter here.
Zapier Integration
If no Native App integration is available in NileDesk, you can use Zapier to connect with thousands of apps without writing code. NileDesk communicates with Zapier, and Zapier forwards the data to your chosen application. Here’s how:
- Select Zapier from the integration dropdown and save the step.
- Log in to Zapier and create a new Zap.
- Choose NileDesk as the Trigger App and authenticate using your API Key and Organization ID.
- Select the Template and Integration Task created in NileDesk.
- Add the relevant third-party app (e.g., Google Sheets, Trello, Gmail) as the Action in Zapier.
View step-by-step configuration details for Zapier here.
Example: You want every new lead in NileDesk to be sent to a Google Sheet.
- Create a Zap with NileDesk Integration Task → Google Sheets Add Row.
- Map fields such as
{{lead_name}},{{email}}, and{{phone}}. - Whenever the workflow reaches this step, Zapier automatically inserts the new lead into your sheet.
Custom API Integration
For maximum flexibility, NileDesk lets you call any external REST API directly.
- Select Custom API in the Integration Task.
-
Configure your request:
- Request Type –
POST,GET,PUT, orPATCH. - API URL – e.g.,
https://{{subdomain}}.yourapp.com/api/endpoint - Request Body (for POST/PUT/PATCH):
- Request Type –
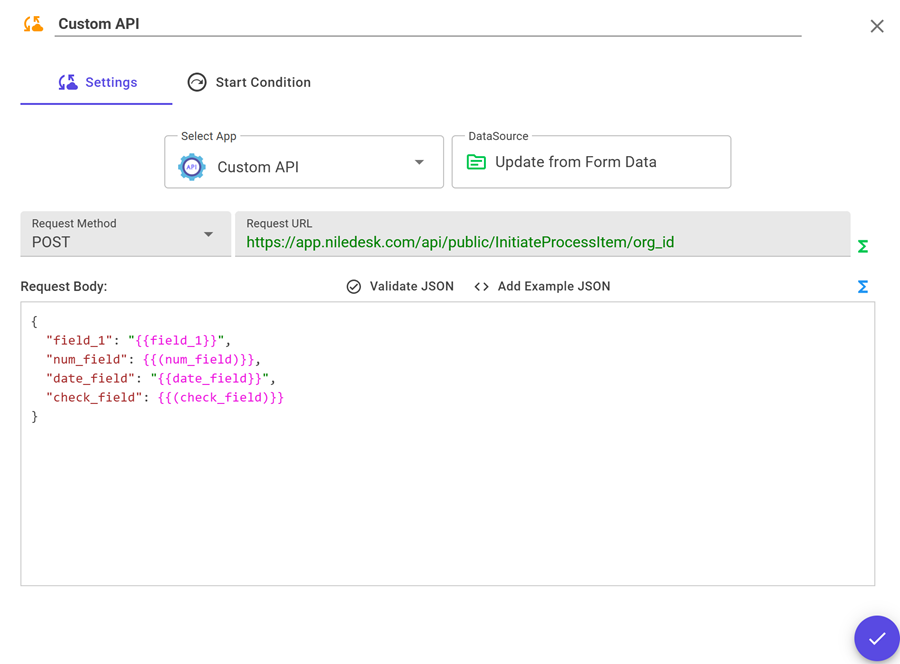
{
  "field_1": "{{field_1}}",
  "num_field": {{(num_field)}},
  "date_field": "{{date_field}}",
  "check_field": {{(check_field)}}
}
Form fields are dynamically inserted into the body at runtime.
- Headers – Add authentication headers such as
Authorization: Bearer <token>. - Save – Once saved, NileDesk will automatically call the API when the workflow reaches this step.
Example: Automatically POST a new lead from NileDesk to a CRM API:
https://crm.example.com/api/leads, with body fields mapped from NileDesk form fields.
Start Condition Tab
By default, task execute in the order defined in the process diagram. However, you can configure conditions that determine whether this task should run or be skipped. The available options are:
- Always Execute (Default) – The task always runs as part of the sequence.
- Evaluate Condition – Create a visual filter-style condition. If the condition is met, the task executes; otherwise, it is skipped.
- Evaluate Expression – Write a dynamic expression using form fields.
At runtime, if the expression evaluates to
true, the task executes; if not, it is skipped and the process moves to the next step. - Evaluate with AI: For more advanced control over when to execute or skip task, NileDesk allows you to define a natural-language prompt that AI can evaluate using selected context data such as form fields, form tables, or the process timeline. This enables you to describe complex conditions in plain language, allowing AI to intelligently determine whether a specific step should be executed or skipped.