Users Management
User Management in NileDesk allows organization administrators to control who can access the platform, what roles they hold, and how they interact with processes. This section is accessible only to users with the Developer or Account Admin roles.
The User Management Workspace
The workspace provides a central hub where Account Admins can:
- Manage individual users
- Assign roles and permissions
- Organize users into groups
- Configure delegations to ensure task continuity
Managing Users
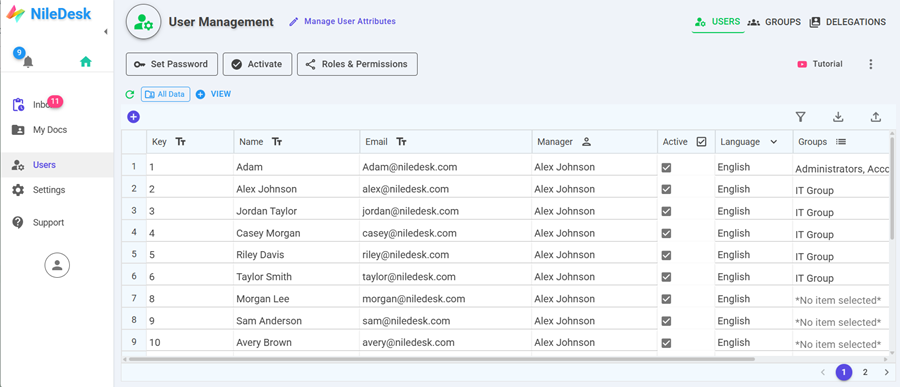
The Users tab displays a grid-based dashboard listing all existing users. The interface behaves like a spreadsheet, allowing quick edits and easy navigation.
Creating a New User
- Click the + button to add a new row.
- Enter required details such as name, email, and attributes.
- Set a password and activate the user account.
Note: A user cannot log in until their account is activated.
Selecting a User
- Each row is numbered on the left (1, 2, 3 …).
- Click a row number to select a user (the row turns gray).
- Click again to deselect or choose another row.
Setting a Password
- Select a user by clicking their row number.
- Click Set Password in the top menu.
- Enter the new password twice and click Save.
Activating a User
- Select a user.
- Click Activate.
- Confirm the action.
Once activated, the user will receive a confirmation message and can log in.
Deactivating a User
- Select an active user.
- Click Deactivate.
After deactivation:
- The user’s license is released.
- They can no longer log in to NileDesk.
User Roles & Permissions
NileDesk uses role-based authorization to control access at both template and organizational levels. Roles determine what a user can see or do in processes, boards, datasets, and forms.
Managing Roles & Permissions
- Select a user from the grid.
- Click Roles & Permissions.
The dialog displays:
- All assigned roles per template.
- Options to assign new roles or revoke roles (via the X button).
- The ability to assign roles across multiple templates at once.
Copying Roles from Another User
To speed up onboarding:
- Select the new user.
- Open Roles & Permissions.
- Go to the Copy Roles tab.
- Select a source user.
- Choose which roles to copy, or copy all.
- Click Start Copy to apply.
Tip: Use this feature when multiple users require identical access as existing team members.
User Groups
Groups simplify management of permissions, notifications, and tasks for multiple users at once.
Accessing Groups
Open the Groups tab in the User Management Dashboard to see all groups, including system-defined and custom ones.
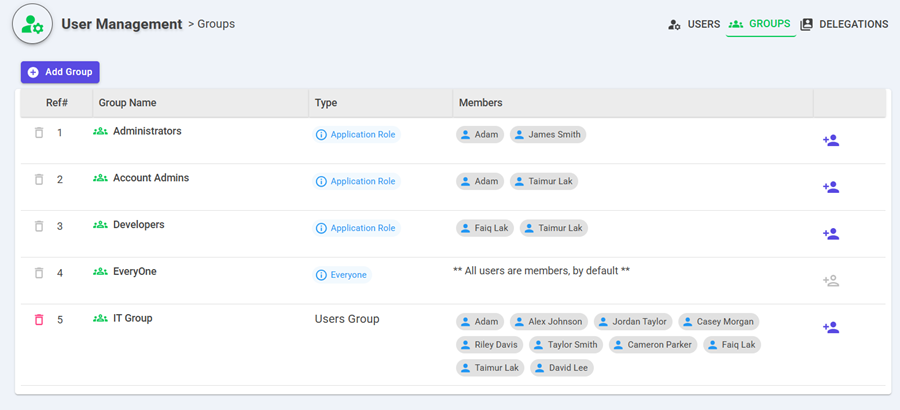
Default System Groups
By default, the system has four groups already defined. Three of them have specific user roles linked, so members of these groups receive special access in NileDesk.
- Administrators: Users in this group have below special access to system features:
- Managing global organization settings
- Managing all user accounts
- Creating new templates of any type
- Account Admins: Users in this group can access and manage all user accounts.
- Developers: Users in this group can create new templates of any type in NileDesk.
- Everyone: This special group automatically includes all users, and membership cannot be modified. Any permissions or notifications applied to this group affect all users.
Note: Access to different process templates and datasets in NileDesk requires specific permissions assigned to each template. Being an Administrator only grants the roles listed above; users still need explicit permissions to access individual processes.
Creating a Custom Group
- Click + Add Group.
- Enter a name and confirm.
Adding or Removing Members
- Each group has a blue user icon (+) beside it.
- Click the icon to open a user selection dialog.
- Add or remove users as required.
Note: Groups cannot contain other groups—only individual users.
User Delegation
Delegations ensure business processes continue smoothly when a user is unavailable. Tasks assigned to the original user are automatically redirected to the delegated user.
Setting Delegation for Your Own Account
- Go to your User Profile.
- Select the delegated user.
- Define start and end dates for delegation.
Central Delegation Management (Admins)
Account Admins can manage all delegations from the Delegations tab:

- Monitor active delegations.
- Manually assign or revoke delegations for users.
Note: Delegation prevents workflow breakdowns by ensuring every task always has an active owner.
Key Takeaways
- Only Developers and Account Admins can manage users.
- Users must be activated before they can log in.
- Roles & Permissions can be set individually or copied from another user.
- Groups simplify bulk management but cannot be nested.
- Delegations keep processes moving when users are unavailable.