Creating a Process Flow
A Process Flow in NileDesk is a structured workflow that combines a Form, Steps, and Views to define how information is captured, routed, and displayed throughout its lifecycle. Use it to model approvals, requests, and other business processes with precision.
Create a Process Flow
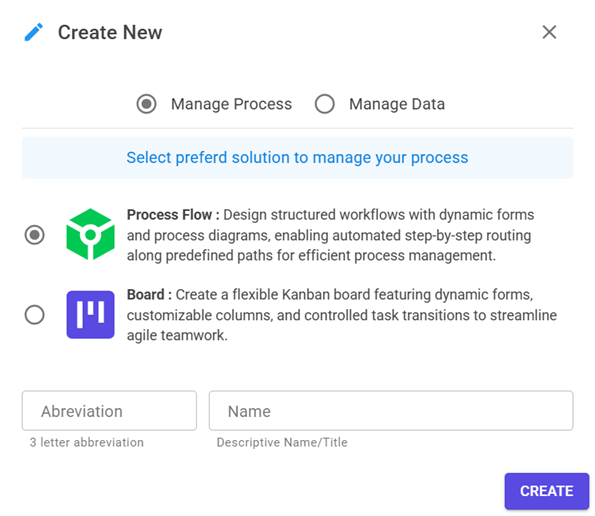
- From the home screen, click Create New, It will open dialog to chose what to create.
- Select Process Flow from the template options.
- Enter a name and a 3-letter abbreviation (appears on process items for quick identification).
- Click Create to open the Process Designer.
Process Designer Overview
The Process Designer is divided into three main sections:
- Form Designer — Build the fields, tables, and layout of your form.
- Process Flow Diagram — Define the workflow diagram of steps, tasks, and branches.
- Views — Control how fields appear, behave, or change at different steps.
Form Designer
The Form Designer in NileDesk allows you to visually design the data entry experience for your processes, boards, and datasets. It is a drag-and-drop environment where you can pick from a wide range of Fields, arrange them into logical sections, and customize layouts for both desktop and mobile users.
All available fields are listed in the side panel and can be dragged onto the form canvas. Whether you need to capture customer information, upload files, take signatures, or record tabular data, NileDesk provides specialized fields to cover different scenarios.
You can always rearrange fields by dragging them, even after placement. This makes it easy to refine the design as your form evolves.
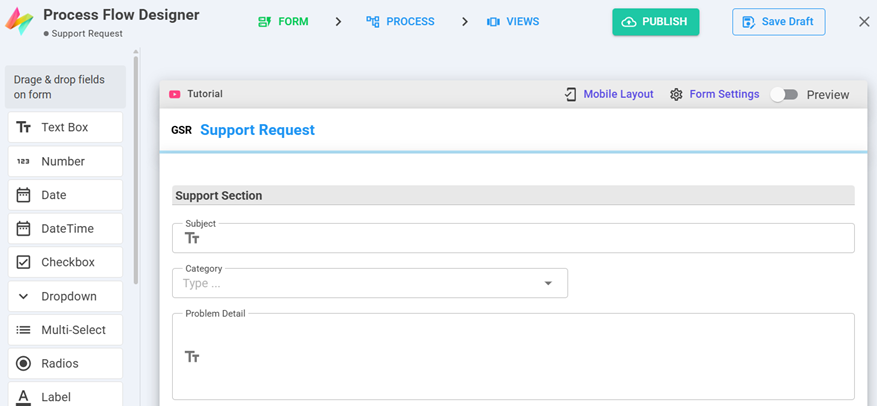
Form Sections
Fields in a form must always be placed inside a Field Section. Sections help organize the form into logical groups so users can focus on related information together. NileDesk also supports Table Sections, which let you add tabular rows of data inside your form — especially useful for “header and detail” scenarios such as invoices, purchase orders, or multi-line approvals.
Form Settings
The Form Settings panel gives you global controls over how your form behaves. Some of the key options include:
- Outlined Fields — Toggle field borders on/off for a cleaner or more structured look.
- Adjust Fields — Automatically re-balance remaining fields if some fields are hidden by conditions.
- Process Subject — Define a dynamic subject line for your process (e.g., “Invoice #1234 – ACME Ltd”).
Design Form with AI
The AI Form Designer in NileDesk allows you to instantly create a complete and structured form using a simple natural-language prompt. To begin, click on the “Ask AI” option at the top of the form designer. This will open a side panel where you can describe the form you want to build — including its fields, tables, and any specific requirements.
Your prompt can be descriptive, for example:
Or it can be generic, such as:
Once the prompt is ready, click Generate beside the AI prompt box. After processing for a few seconds, NileDesk AI will display a structured preview of sections, tables, and fields based on your description. You can review the results, remove any unnecessary elements, and then click Save to instantly generate a professionally organized form layout.
After generation, you can further refine your form — define validation rules, connect data sources, or add logic expressions to make it fully process-oriented and ready for use.
The AI Form Designer only adds new sections or tables and never modifies your existing fields. This ensures that your current setup remains intact and prevents any unwanted changes.
Note: The AI Form Designer feature is available only in the AI+ plan or self-hosted NileDesk deployments.
Mobile Layout
Modern processes are often run on-the-go. To ensure your forms look good on smaller screens, the designer provides a Mobile Layout option at the top. This lets you preview and adjust how your form will appear on mobile devices.
Process Flow Diagram
The Process Flow Diagram Designer in NileDesk is where you visually build, organize, and refine your workflows. Think of it as a canvas where every activity in your process — from simple data entry to complex approvals, branching, and automated tasks — can be mapped out step by step.
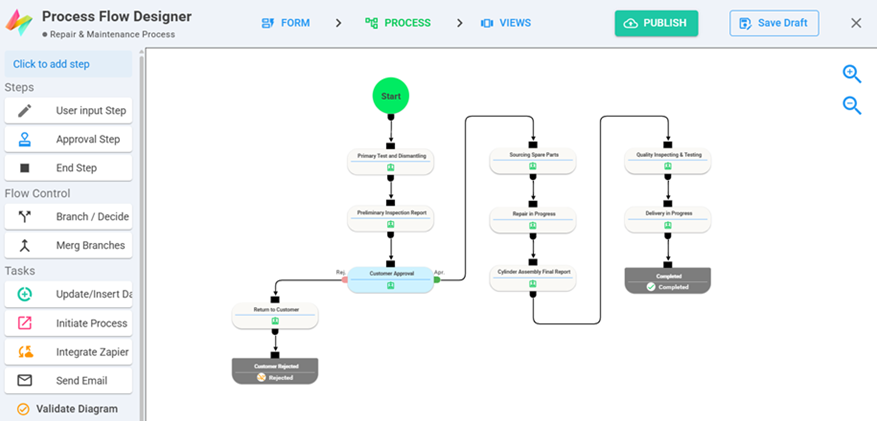
1. Steps
Steps are used to collect inputs and approvals from users.
- Input Step — Gather data or information needed to move the workflow forward.
- Approval Step — Assign approval or rejection to specific users or roles.
2. Tasks
3. Routing Elements
- Start Step — Marks the Start of a workflow.
- End Step — Marks the completion of a workflow.
- Decision Step — Routes items conditionally based on data or rules.
- Junction — Merges multiple branches back into a single branch of workflow.
Design Process Diagram with AI
You can quickly model a complete process flow in NileDesk using a simple natural-language prompt. To begin, click on the “Ask AI” option available on the Process Designer toolbar.
Tip: The AI Designer is intended for creating new processes only. The Ask AI button appears on the toolbar only when the diagram is cleared and only the Start Step remains . This ensures a clean canvas for generating a full process automatically.
Clicking the Ask AI option will open a side panel where you can describe how you want your process to function — including the steps, conditions, and tasks involved.
Because process diagrams rely heavily on flow details, it is recommended to include as much information as possible in your prompt. For example:
“Create a customer sales invoice process. After submission, it should go to the manager for approval. If the manager rejects, send a notification to the salesman and mark the process as rejected. If approved, proceed to the next step, update the inventory, then send a notification to the salesman and complete the process.”
Once your prompt is ready, click Generate beside the AI prompt box. After a few seconds of processing, the system will show an Apply button. Clicking it will instantly add a complete, structured process diagram to your workspace.
After generation, you can fine-tune each step or task — assign users, add task functions, or refine logic to make the process fully ready for live execution.
Note: The AI Process Designer feature is available only in the AI+ plan or self-hosted NileDesk deployments.
Views
The Views panel lets you control, step-by-step, how a form behaves and what users see at each process step. Use it to configure field visibility, required/mandatory status, read-only mode, table-row behavior, and to attach conditional logic (via Step Events) that runs on form lifecycle events.
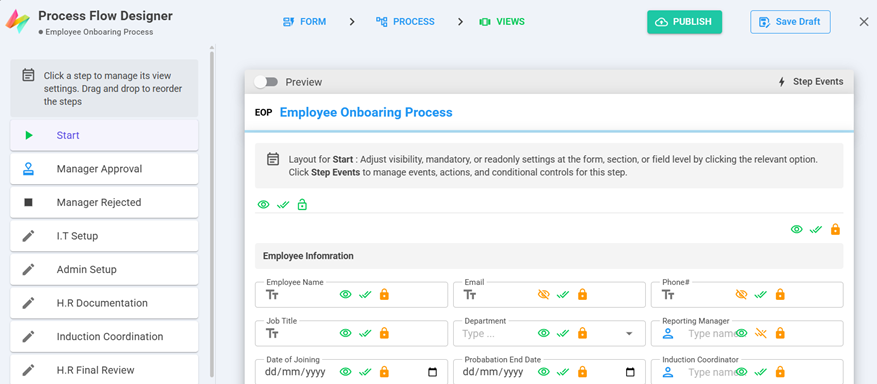
Step Events
In the Views section of the Process Flow Designer, Board Designer, and Data Forms Designer, there is a Step Events button. This option allows users to configure various actions that should be executed during specific events of a process form at different steps.
When you click the Step Events button, an event editor opens for the selected step, enabling you to define behavior based on different process events.
Step Events in Process Flows
Process flows support the following events:
- On Load – Triggers when a user opens a form in NileDesk at a specified step.
Available Actions: Disable Field, Enable Field, Set Mandatory, Set Option, Refresh Field Value, Set Field Value. - On Submit – Triggers when a user clicks the "Send" button on an input or start step.
Available Actions: Validate a Situation, Refresh Field Value, Set Field Value. - On Approve – Triggers when a user presses the "Approve" button on an approval step.
Available Actions: Validate a Situation, Refresh Field Value, Set Field Value. - On Reject – Triggers when a user presses the "Reject" button on an approval step.
Available Actions: Validate a Situation, Refresh Field Value, Set Field Value. - On Cancel – Triggers when a user presses the "Cancel" button on the process form.
Available Actions: Validate a Situation, Refresh Field Value, Set Field Value. - On Transfer – Triggers when a user transfers the assignment of a step.
Available Actions: Validate a Situation, Refresh Field Value, Set Field Value. - On Return – Triggers when a user sends the process back to a previous step.
Available Actions: Validate a Situation, Refresh Field Value, Set Field Value.
Publishing
- Publish — Click Publish button once all design completed and makes the process flow available for creating items.
- Save Draft — Saves your design for further editing before publishing.