Schedule a Process
Users can schedule different processes to be created automatically at a specified time on a daily, weekly, monthly, or yearly basis. This feature is especially useful for recurring tasks, preventive maintenance, and other routine processes where a new assignment must be generated automatically without requiring any manual action from other users. Once scheduled, the system will create new process items at the defined intervals so users can focus on execution rather than remembering to initiate them manually.
Each process can be scheduled directly from its workspace. To do this, click the three-dot ((⋮)) menu option at the top of the process and select the Scheduled Task option.
Note: The ability to schedule a process requires permission. By default, general users do not have this access. An administrator must enable it for users who need scheduling privileges.
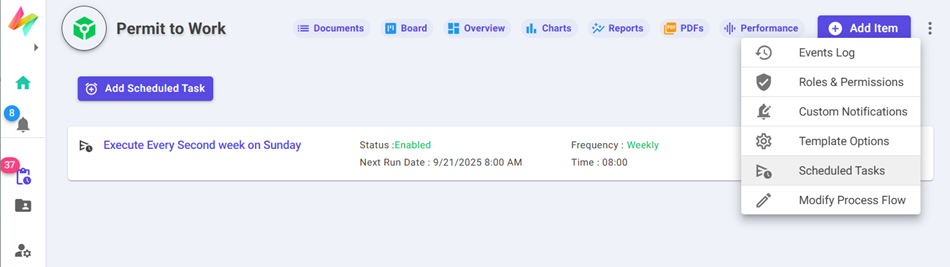
When you click this option, the Scheduled Tasks section for the template opens. Here, you will see a list of any existing scheduled tasks. You can click on Add Scheduled Task to define a new task based on your required schedule.
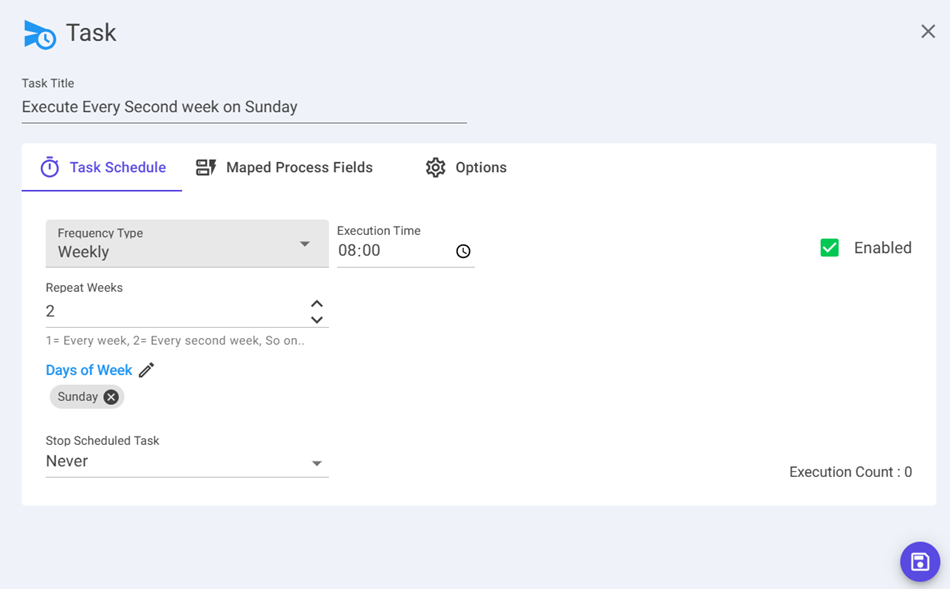
Scheduling a Task: In the scheduling dialog, you will first enter a descriptive Name for the schedule. This helps in identifying its purpose later. Next, you select the frequency type that suits your requirement. Available options are:
- Daily: The task will run every day by default. You can adjust the Repeat Every X Days setting (default is 1). For example, if set to 2, the task will run every second day.
- Weekly: Runs every week. Options include:
- Repeat Weeks: Example: 1 = every week, 2 = every second week, etc.
- Week Days: Select one or multiple days (e.g., Monday, Wednesday, Friday).
- Monthly: Runs every month with options to:
- Select one or multiple dates within the month.
- Handle invalid dates (e.g., February 30). Choose whether to Skip Invalid Dates or execute on the last valid day of the month instead.
- Select Last Day of Month as a fixed option, regardless of month length.
- Yearly: Runs every year with extended customization:
- Select one or more dates within the year.
- Choose how to handle invalid dates in the same way as Monthly scheduling.
- Select the Months of the Year in which the task should run (you can pick multiple months).
Execution Time: Choose the exact time of day when the task should run. Stop Schedule After: Define when the scheduled task should stop:
- Never (default): The task continues indefinitely.
- At a Specific Date: The task stops after the given date.
- After a Number of Executions: The task stops once it has run the specified number of times.
Enabled: A toggle to quickly enable or disable the scheduled job without deleting it.
Mapping Fields: After defining the schedule, you can use the Mapping Fields tab to predefine the initial values of the process items created by this schedule. Here you can set:
- Fixed static values for fields.
- Dynamic expressions for fields, allowing flexible logic depending on business needs.
Options Tab: This tab provides two important controls for newly created items:
- Initiator of New Items: Select the user who will be marked as the initiator of items created by this schedule.
- Document Status: Decide whether newly created items remain in Draft mode or should be automatically submitted to begin execution immediately.
Once everything is configured, click Save. The system will calculate the next run time based on your setup, and the task will automatically execute when the scheduled time arrives.