Process Steps
In NileDesk, steps define how a workflow progresses. Each step is a stage where data is captured, reviewed, or acted upon. There are two main step types:
Types of Steps
a. Input Step
An Input Step collects data. Users can fill in fields or form tables depending on the workflow design.
b. Approval Step
An Approval Step is a decision point where assigned users can approve or reject the item. based on rejection or approval of step workflow of process will follow different branch of execution.
Add steps from the left sidebar in the process editor and connect them in the diagram. Clicking a step highlights it and shows action icons (delete / settings). The settings icon opens the configuration dialog.
Step Settings Dialog
At the top, give the step a clear Step Name for easy identification. The dialog is organized into tabs:
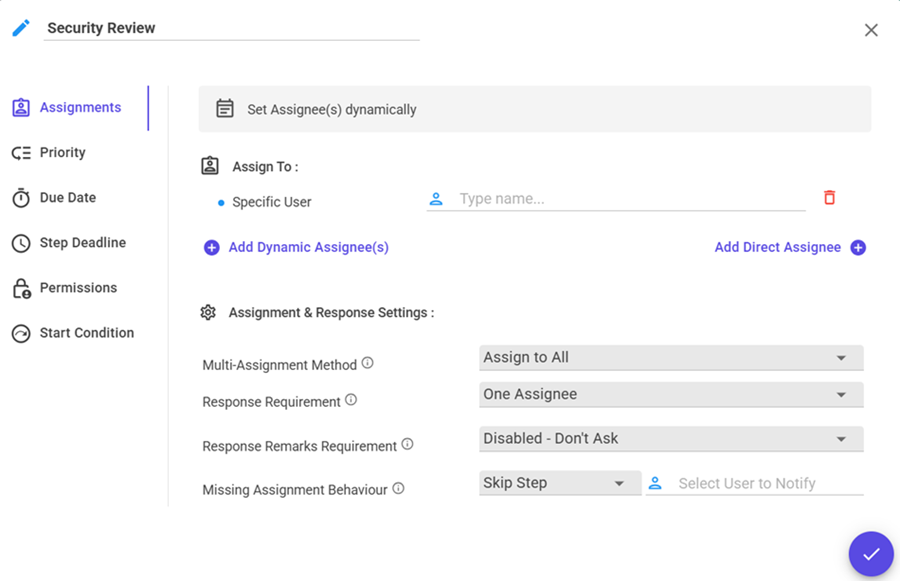
Assignments Tab
Decide who is responsible for this step and how their responses are processed.
Direct Assignments
- Specific User – assign to a fixed user.
- User Selected in Field – assign based on a user field in the form.
- User by Access Role – assign to all users with a role.
- User Group – assign to a predefined group.
- Document Initiator – assign to the creator of the document.
- Initiator’s Manager – assign to their manager (set in user management).
- Step Executor – assign to whoever executed a previous step.
- Executor’s Manager – assign to the manager of a previous executor.
- Custom User Expression – calculate user(s) via an expression.
You can combine multiple direct assignments (e.g., initiator + group + specific user).
Dynamic Assignments
- From NileDesk Users – filter from the full user list.
- From a Dataset – assign via dataset lookups with conditions.
- From a Form Table – assign based on user fields inside a form table.
Assignments & Response Settings
Multi-Assignment Method
This option defines how a step is distributed when multiple assignees are available. It controls which assignee(s) will actually receive the task:
- Assign to All – Every assignee gets the step simultaneously.
- Least Loaded – The step is assigned to the user with the fewest current tasks.
- Round Robin – Assignments rotate evenly among assignees to balance workload.
- Assign with AI
- Defined Assignees: Shares the list of predefined users eligible for this task, allowing AI to select from them.
- Form Data: Includes all form data available at the time of execution.
- Timeline Data: Provides access to process history — completed steps, performers, comments, and timestamps.
- Form Tables: If the process form includes tables, you can choose which ones to share for AI reference.
NileDesk allows you to intelligently assign users to steps using the power of AI. This feature enables smart, context-aware decisions for routing work within your processes.
When you select the Assign with AI option, a panel appears under it where you can enter your AI prompt. This prompt defines how NileDesk should evaluate the situation and decide who should be assigned.
Assignment AI Context
It’s important to specify what information NileDesk should make available for AI reference during assignment. The following context options can be enabled or disabled based on your requirements:
Tip: Except for Defined Assignees, all context options are optional. Enable only the data that is necessary for accurate AI decisions. This keeps processing efficient and avoids confusion from irrelevant information.
AI Assignment Prompt
The AI Assignment Prompt offers complete flexibility. You can reference form field values, define conditional logic, or even use datasets as dynamic matrices to select users based on real-time conditions.
For example, in a Customer Complaint Form, you may want AI to understand the complaint and automatically assign it to the relevant department:
“If the customer complaint is about HR, assign it to User X. If it’s related to Sales, assign it to User Y.”
This approach enables context-aware, intelligent, and automated task routing across your workflows.
Missing Assignment Behaviour
When assignees are selected dynamically from a dataset or form fields, there may be situations where your defined conditions don’t handle all possible cases.
For example, a required field used for assignment might not be filled, the dataset could be empty, or a user may leave a field unset.
In such cases, no valid assignee is available for step assignment.
- Skip Step – Also optionally allow to notify a user
- Fallback User – assign to a backup user
- Assign Group - assign to a group of users
- Pause Process – Also optionally notify a specific user
Response Required
This option defines how a step is considered complete when it has multiple assignees. Based on the selected setting, the step will be marked as finished when:
- All Assignees – Every assignee has completed their action.
- Single Assignee – The step is completed as soon as any one assignee responds.
- Percentage – A specified percentage of assignees (e.g., 50%) have responded.
- Number of Assignees – A fixed number of assignees (e.g., 2) have completed their part.
Tie Behavior
This option applies only to Approval Steps. It determines what happens when multiple assignees are involved and their responses result in a tie (equal number of approvals and rejections):
- Approve Step – The step is marked as approved in case of a tie.
- Reject Step – The step is marked as rejected in case of a tie.
Response Remarks
This option controls whether users must provide remarks in the timeline before performing actions on a step:
- Disabled (default) – No remarks field is shown.
- Optional – Users may add remarks, but it’s not required.
- Required – Users must enter remarks before completing the action.
Priority Tab
Define conditions to set a priority flag when the step is activated. The first matched condition applies. Set Priority with AI
NileDesk allows you to define scenarios using a natural-language prompt and automatically determine the task or item priority flag based on those conditions.
Due Date & Step Deadline Tabs
NileDesk allows you to dynamically set process level due dates or deadlines for steps and processes using AI or through Conditional No-Code Interface.
With Conditional Logic: By default, the system allows you to define conditions using no-code filters applied to form data, enabling you to evaluate specific situations and automatically set deadlines or due dates accordingly.
With AI : For more advanced and flexible scenarios, you can switch to the AI-driven option. This enables you to write a natural-language prompt that defines how deadlines should be calculated based on contextual information.
The AI prompt can optionally access several context sources, including:
- Form Data: Information currently entered in the form.
- Form Tables: Tabular data contained within the process form.
- Timeline Data: Process execution history — steps performed, actions taken, and timestamps.
Using this approach, AI can intelligently interpret your described scenario and automatically determine the most relevant due date or step deadline — even in complex or conditional business situations.
Due Date and Deadline Options:- Set due date in hours, days, or via expressions from activation time.
- Optionally apply the Organization organization calendar (working hours/holidays).
- Notify assignees before, on, or after the due date.
- Reassign step to specific users if deadline is not meet (Only for step deadlines)
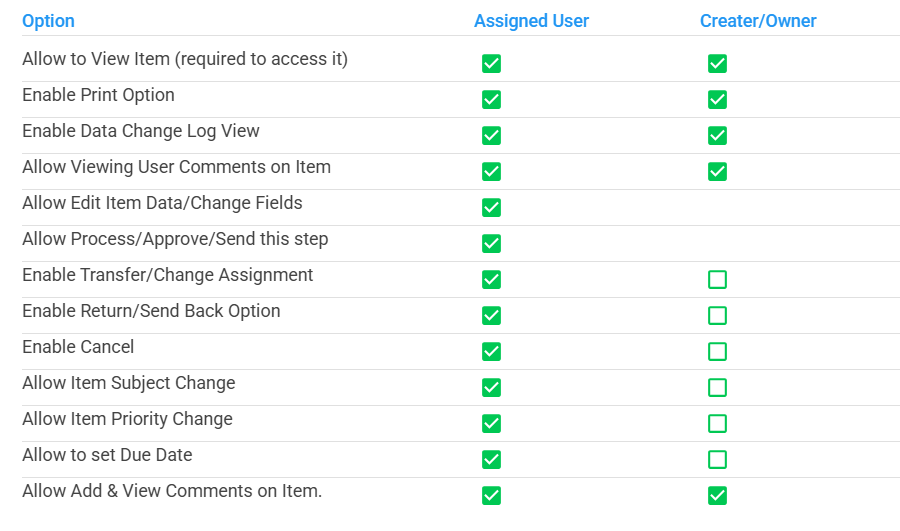
Permissions Tab
Decide what assignees and the initiator can do in this step. Role-based permissions remain active if already granted.
Start Condition Tab
By default, steps execute in the order defined in the process diagram. However, you can configure conditions that determine whether a step should run or be skipped. The available options are:
- Always Execute (Default) – The step always runs as part of the sequence.
- Evaluate Condition – Create a visual filter-style condition. If the condition is met, the step executes; otherwise, it is skipped.
- Evaluate Expression – Write a dynamic expression using form fields.
At runtime, if the expression evaluates to
true, the step executes; if not, it is skipped and the process moves to the next step. - Evaluate with AI: For more advanced control over when to execute or skip a step, NileDesk allows you to define a natural-language prompt that AI can evaluate using selected context data such as form fields, form tables, or the process timeline. This enables you to describe complex conditions in plain language, allowing AI to intelligently determine whether a specific step should be executed or skipped.